This exercise requires completion of Exercise One: Generating Data From a Linear Model. The model used in this exercise follows the data generating process below:
STEP ONE: PREPARE THE WORKSPACE
We will begin this exercise from the GAUSS Source Page. Navigate to the Source Page by clicking the “Source” tab on the left of the application.
As in excercise one, clear the variables from your workspace and clear the program input/output window by entering the new and cls commands from the command-line. Remember that this will clear all data from your work space and clear the input/output screen but will not erase your program files.
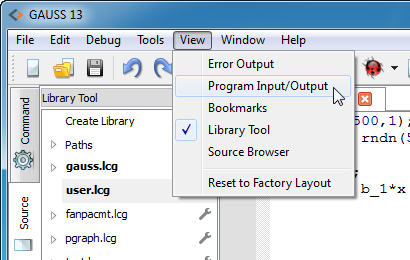
If the program input/output window is not open on the Source Page, you may open it from View menu at the top of the Source Page.
STEP TWO: OPEN THE FILE
If the file you created in exercise one is not open, open that file with one of the methods below:
- From the main application menu select “File->Open File”
- Use the hotkey CTRL+O
- From the main application menu select “File->Recent Files”
- Enter
edit <filename>;
into the program input/output window. Note that the <> around “filename” above indicate that user will enter a the name of a file rather than the word “filename”.
STEP THREE: RUNNING THE PROGRAM FILE
Using the Run button
The Run button is located on the main application toolbar. There are two ways to use the Run button. You may either click the Run button directly or choose from a list of files to run by selecting the downward pointing triangle to the right of the Run button.
If you select the downward pointing triangle, you will see a list of files followed by the final option which is “Current File”. These are the files that you have most recently run. The last file that you ran will be at the top of the list. Selecting “Current File” will run the last file that your cursor was in.
Hovering over the Run button will provide a tooltip with the name of the file at the top of the list. This list of files is called the Action List. The two buttons to the right of the Run button, the Debug and Edit buttons, operate on the same list of files.
RUN YOUR FILE
If your example file has not been run, place your cursor in the file and select “Current File” from the Run button’s action list. When the program begins, you will see a message on the bottom left of the status bar, “Running”. This message will be followed by “Program Finished” at the conclusion of the program run.
OTHER METHODS TO RUN A FILE
- The CTRL+R hotkey performs the same action as selecting “Current File” from the Run button action list.
- Entering
run <filename>;
into the program input/output window.
STEP FOUR: VIEWING THE GENERATED DATA
Using the Data Page
Navigate to the Data Page by selecting the “Data” tab on the left of the application.
The two main windows on the Data Page are the Active Symbols window and an area for tabbed symbol editors. The program input/output window is also available to be opened on this page.
THE ACTIVE SYMBOLS WINDOW
GAUSS organizes the active symbols by symbol type. Clicking on the arrows next to any symbol type expands a list of currently active symbols. Expand the “Matrices” node by clicking on the hollow arrow. A list of matrix names will appear.
Hovering over a matrix name will open a tooltip preview of the matrix. Double-click a matrix name to open the entire matrix in a symbol editor.
Like a spreadsheet each number in a symbol editor is contained in a cell. Symbol editors allow you to view the entire contents of a matrix and to change the contents of cells. Double-click a cell will allow you to change its value.
OPEN FLOATING SYMBOL EDITORS FROM THE SOURCE PAGE
While editing a file on the Source Page, you may inspect the current contents of a matrix by opening a floating symbol editor. Place your cursor on the variable name and use the hotkey CTRL+E to open the matrix in a symbol editor.
STEP FIVE: SAVING DATA
Any GAUSS matrix can be saved and easily reloaded for future use. This is a convenient way to access data and eliminates the need to re-run old program files. To save a matrix x that exists in your current workspace, enter the command:
save x;
This will save the contents of the matrix x to a file named x.fmt in your current working directory. GAUSS’s current working directory is indicated by the current working directory combo-box on the main application toolbar.
You may load this matrix back into a later GAUSS session by entering the command:
load x;
This will create a new matrix named x in your GAUSS workspace with the contents from the file x.fmt that was saved on disk.
SPECIFYNG A SAVE PATH
If you would like to save your variables to a specific location rather than the current working directory, you may set a save path. You may either set a global save path or a local save path.
SETTING A GLOBAL SAVE PATH
Setting a global save path will tell GAUSS to save all variables saved with the save command to this location. To set C:\gauss13\data to be your global save path, enter:
save path = C:\gauss13\data;
After executing that command, all future variables saved with the save command will be saved in C:\gauss13\data.
SETTING A LOCAL SAVE PATH
A local save path is in effect for only one statement. If you would like to save the matrix x to C:\gauss13\data, but would not like this to effect other uses of the save command, enter:
save C:\gauss13\data=x;
SAVE THE MATRIX X AND Y FROM THE EXAMPLE PROGRAM
Run the example program again to create fresh data. Now save the matrices x and y for use in the next part of our tutorial with the command:
save x;
save y;


