AUTOCOMPLETION OF VARIABLE NAMES, MACROS, AND STORED RESULTS
You can now write code more easily with autocompletion of variable names.
Macros and stored results are now autocompleted too. Even more, you have control of which types of autocompletion you wish to use and where it should appear. Say that you want autocompletion even while typing comments and strings. You do not wish to autocomplete macro names to avoid confusion. So you choose the Edit option in your Do-file Editor, click on Preferences, go to the Autocompletion tab, and enable these preferences.
TEMPLATES
Suppose you want to write a new Stata command, implemented in an ado-file, and make sure it follows Stata standards, especially regarding version control. You can now open a new document from a template. When you select ado, the ado template will be automatically loaded:
You can start with this template and fill in the code to implement your new command.
Do you have your own preferred formatting for do-files and ado-files? You can also create your own templates to make your coding more efficient.
CURRENT WORD AND SELECTION HIGHLIGHTING
In the Do-file Editor, you may want to see all matches to a word or a longer selection. Perhaps you want to find all instances of a variable name, macro, or function. You can now place your cursor on a word or make a selection, and all the matches will be highlighted.
The Do-file Editor allows you to have control over this highlighting. Suppose that you want to see all matches to the macro or function that you click on but that you do not wish to see the matches that are in comments or strings, or matches that are keywords, to avoid confusion. So you choose the Edit option in your Do-file Editor, click on Preferences, go to the Highlighting tab, and enable your preferences.
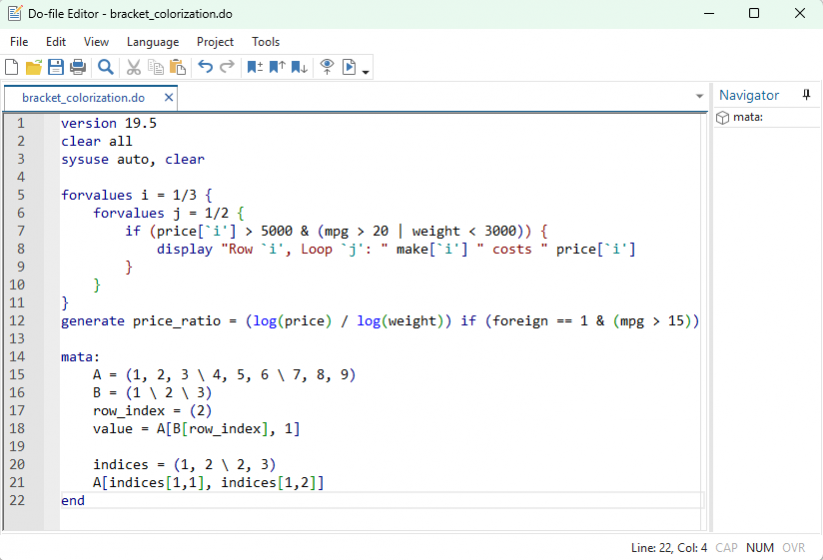
BRACKET PAIR COLORIZATION StataNow
When you are typing nested if expressions, it can be difficult to tell which closing } belongs to which opening {. With bracket pair colorization, each nesting level of brackets receive a distinct, reusable color, making it easy to trace from a closing }, ), or ] to its matching open bracket even in deeply nested, multi-line expressions. Unmatched brackets are also displayed in a unique color allowing them to stand out in the code.
BRACKET HIGHLIGHTING
You want to start coding within a block of code, say, an if block, and you want to confirm you are in fact within the code block and your brackets are balanced. You click within the code block, and the surrounding brackets are highlighted so that you can see where the code block you are in starts and ends.
© Copyright 1996–2026 StataCorp LLC. All rights reserved.
CODE-FOLDING ENHANCEMENTS
When you have programs, forvalues loops, if blocks, and other foldable blocks of code, it can be helpful to fold these so that you can focus on other portions of your code. You can now select the Fold all menu item to quickly fold all foldable lines of code.
Notice that once the code is folded, an arrow pointing to the right appears next to the folded code. You can click on the arrow to unfold one block. Or you can select the Unfold all menu item to unfold all the folded block.
TEMPORARY AND PERMANENT BOOKMARKS
There is a line of code that impacts the code you are currently working on, so you need to find it quickly and easily. However, it is not important enough to give it a permanent bookmark, so you decide to toggle a temporary bookmark. You can now find the line quickly by seeing its bookmark icon or by using the Next bookmark and Previous bookmark menu items.
SHOW WHITESPACE AND TABS
Now let’s imagine you want to see whitespace but not all the time because it is too distracting. When the Always show whitespace in a selection preference is selected in the Do-file Editor’s preferences, you can select some text and see the spaces as dots and the tabs as arrows.
NAVIGATOR PANEL
Suppose you are working in a massive document with many important sections. You now can use the Navigator to switch between programs and bookmarks instantly by selecting the items on the list within the panel.
CHANGE HISTORY RIBBON StataNow
While editing a document, you may want to see which lines you have changed since you first opened the document. The change history ribbon will display an orange indicator for each line that has had a change made to it to indicate that the line has been modified. After saving the modified document, we can see that undoing a line’s changes to its original state from when the document was first opened displays a blue indicator in the change history ribbon to indicate that the line has been reverted to its original state.